

A luxury yacht’s hull is its first line of defense against the sea, and a compromised hull doesn’t just hurt performance — it quietly erodes your vessel’s market value in ways that only surface after a costly survey. Most owners discover hull problems at exactly the wrong moment: during a pre-sale inspection or a mandatory refit, when remediation is rushed and options are limited. We’ve seen meticulous vessels lose significant resale position because a previous restoration prioritized aesthetics over structural integrity. This guide gives you the expert-backed framework to do it right, covering every stage from initial assessment through protective finishes.
Table of Contents
- Before you begin: Tools, materials, and what you must know
- Step-by-step process: Inspection, surface prep, and substrate repair
- Material-specific methods: Fiberglass, metal, and wood hull restoration
- Finishing touches: Fairing, barrier coats, and protective finishes
- Luxury case studies and lessons: Superyachts and historic restorations
- Why shortcuts in hull restoration guarantee future headaches
- Ready to elevate your yacht? Expert restoration and custom solutions
- Frequently asked questions
Key Takeaways
| Point | Details |
|---|---|
| Preparation is paramount | Thorough inspection and prep determine 80 percent of restoration quality. |
| Material matters | Choose methods and coatings based on your hull type to prevent failure and maximize longevity. |
| Barrier coats are vital | Applying barrier coats instead of just painting protects against delamination, corrosion, and water intrusion. |
| Costs vary widely | Superyacht hull restoration costs can range from €10,000 to €100,000+ per meter depending on complexity. |
| Expert shortcuts save in the long run | Cutting corners leads to expensive repairs; following pro strategies ensures durable results. |
Before you begin: Tools, materials, and what you must know
Preparation is not a formality in hull restoration. It is, quite literally, the foundation on which every subsequent step either succeeds or fails. Before a single abrasive touches your hull, you need the right gear, the right materials, and a clear understanding of what your hull is made of and how it was originally constructed.
Essential tools and safety gear
Different hull materials demand different tool sets. Here is a practical breakdown:
| Hull material | Key tools | Safety essentials |
|---|---|---|
| Fiberglass | Orbital sander, rotary grinder, fairing boards | Respirator (P100), goggles, Tyvek suit |
| Steel/Aluminum | Sandblaster, angle grinder, wire brush | Full face shield, hearing protection, welding gloves |
| Wood | Hand planes, chisels, belt sander, moisture meter | Dust mask (N95 minimum), eye protection |
Beyond tools, the material inventory matters just as much. You will need marine-grade cleaners and degreasers, abrasives ranging from coarse 80-grit to finishing 320-grit sandpaper, epoxy or polyester resins matched to your hull type, barrier coat primers, antifouling paint, and UV-protective topcoats. Understanding how each of these products interacts with your specific substrate prevents costly compatibility errors.
One area where owners consistently underestimate the technical bar is hull construction knowledge. Whether your vessel is hand-laid fiberglass, cold-molded wood, or welded aluminum plate, the underlying engineering dictates every restoration decision you make. We recommend any owner review evaluating yacht craftsmanship before committing to a restoration plan, because knowing what “correct” looks like is the only way to recognize what has gone wrong.
Common rookie mistakes during assessment and prep
- Skipping a moisture meter reading on fiberglass hulls before sanding
- Assuming that surface cracks are cosmetic without probing their depth
- Using automotive-grade products instead of marine-certified materials
- Failing to address rust bleed-through on metal hulls before applying primer
- Underestimating surface area, leading to mid-project material shortages
Pro Tip: Always buy 15-20% more epoxy and primer than your surface area calculation suggests. Temperature changes, unexpected substrate damage, and application waste will use that buffer faster than you expect.
A proper resale preparation guide will show you how the quality of your restoration directly maps to surveyor reports and buyer confidence, which is why cutting corners in the preparation phase is never a value-neutral decision.
Step-by-step process: Inspection, surface prep, and substrate repair
With all materials staged and safety protocols in place, the actual restoration workflow begins. Think of this phase as the conductor raising the baton — everything from here must follow a precise sequence to produce the right result.
Core inspection checklist
Before touching the hull with any tool, document everything you find. Walk the hull systematically and look for:
- Stress cracks and crazing in gelcoat, which often indicate flex fatigue or impact history
- Delamination — a hollow sound when tapping fiberglass signals separated laminate layers
- Active corrosion on metal hulls, including pitting and galvanic damage near fittings
- Moisture intrusion detected via a calibrated moisture meter; readings above 20% in fiberglass demand immediate attention
- Soft spots or rot in wood hulls, identified by probing with a sharp pick tool
Sequential surface preparation
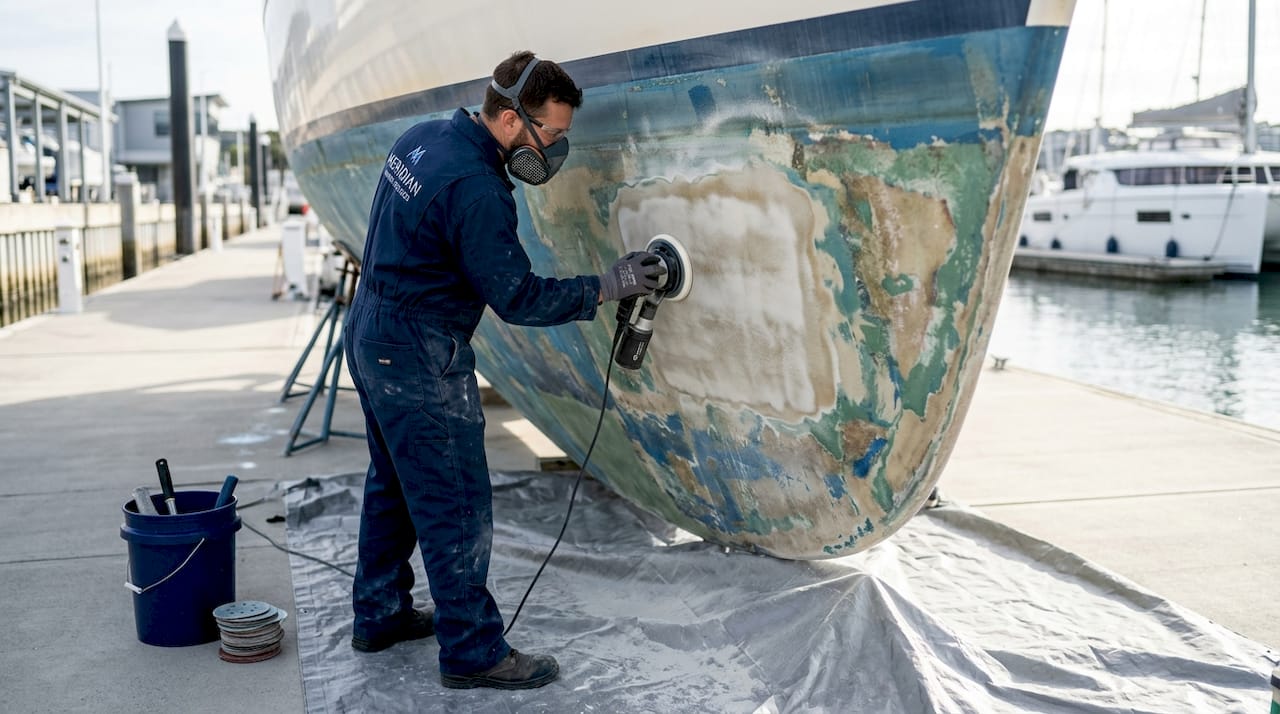
Surface preparation is non-negotiable and involves cleaning, degreasing, sanding to approximately 320-grit, and removing damaged gelcoat or paint through grinding, blasting, or peeling to expose sound substrate. The order matters because cleaning removes contaminants that would otherwise clog abrasives, and degreasing ensures that new coatings bond to the hull rather than to a film of oils or release agents.
| Approach | Fiberglass | Steel/Aluminum | Wood |
|---|---|---|---|
| Paint removal | Peel/grind | Sandblast to bare metal | Hand plane/belt sand |
| Surface profile | 80-220 grit sanding | Blasted anchor profile | Light sanding after rot removal |
| Substrate repair | Epoxy fill, fiberglass cloth | Weld, metal filler | Epoxy-saturated wood patches |
| Primer | Epoxy barrier coat | Anti-corrosion primer | Penetrating epoxy sealer |
This comparison makes clear that there is no single universal workflow. A restoration team treating an aluminum hull the same way they would treat fiberglass will deliver a compromised result. Understanding upgrading yacht value through correct processes is what separates a resale asset from a liability.
Pro Tip: When grinding out damaged gelcoat or laminate, work in a feathered pattern extending at least 2 inches beyond the visible damage boundary. Damage always extends further than it appears on the surface.
Material-specific methods: Fiberglass, metal, and wood hull restoration
Once the general workflow is clear, material-specific knowledge is where restoration quality truly diverges. Each hull type carries its own failure modes, its own chemistry, and its own non-negotiable standards.
Fiberglass hull restoration
Fiberglass is the most common material in modern luxury yachts, but it is also the most frequently misrepaired. The core process involves grinding out all compromised laminate, applying woven fiberglass cloth saturated with compatible epoxy resin in overlapping layers, and fairing once cured. The critical rule: never use polyester resin for below-waterline structural repairs. Polyester absorbs water over time, making it vulnerable to osmotic blistering. Epoxy’s chemical resistance makes it the correct choice for any area in contact with seawater.
- Use epoxy resin for all below-waterline structural and fairing work
- Alternate fiber orientation (0°/90° and ±45°) to restore multi-directional strength
- Sand between each laminate layer for proper mechanical adhesion
- Apply a minimum of two barrier coats before any antifouling paint
Steel and aluminum hull restoration
Material-specific requirements are most demanding for metal hulls: steel and aluminum require sandblasting to bare metal followed by anti-corrosion primers, while the time window between blasting and priming is critical, often measured in hours before flash rust begins. On steel hulls, this means your primer team must be staged and ready before blasting is complete. On aluminum, the concern shifts to galvanic corrosion, particularly around fittings, through-hulls, and any dissimilar metal contact points.
Expert warning: Any shortcut in the metal hull preparation phase — whether leaving mill scale in place or applying paint over even slight surface oxidation — creates a concealed corrosion pathway that will demand far more expensive remediation within three to five seasons.
Wood hull restoration
Classic and historic wooden yachts require the most patient approach. All soft, punky, or rot-affected timber must be removed and the cavity treated with anti-fungal penetrating epoxy before any structural fill. Replacement timber should match the original species where authenticity is a priority, or be upgraded to a more rot-resistant species where compliance and longevity take precedence. Following the superyacht market trends toward authentic classic vessel values, we see that properly restored wooden yachts with documented repair histories command measurably higher prices at auction and private sale.
Finishing touches: Fairing, barrier coats, and protective finishes
Structural integrity matters above all else, but the final finishing sequence determines how long that structural integrity stays protected — and what your vessel looks like in the water.
Professional fairing and feathering
Fairing is the process of filling low spots and shaping high ones to achieve a smooth, hydrodynamically correct hull profile. This is done with marine fairing compound, applied in multiple thin coats and sanded between each application using long boards (typically 16-24 inches) to avoid creating hollows. The feathering technique at the edges of any repair blends the repair into the surrounding surface so that the transition is invisible under paint. Never rush fairing by applying thick single coats; this causes shrinkage cracks as the compound cures.
- Apply fairing compound to all low spots and blended repair edges
- Allow full cure per manufacturer specifications (temperature matters)
- Block-sand with 80-grit on a long board, then follow with 120-grit
- Fill any remaining pinholes with a fine finishing compound
- Final sand to 180-220-grit before barrier coat application
Barrier coats and antifouling systems
Preparation accounts for 80% of the final result, and the expert consensus is clear that barrier coats rather than mere patching prevent delamination and hull weakening. Epoxy is also favored over polyester below the waterline for its superior hydrolysis resistance. A minimum of three epoxy barrier coats should be applied below the waterline, with each coat applied within the recoat window of the previous layer to create a chemically bonded film rather than mechanically adhered separate layers.
- Apply first barrier coat within manufacturer recoat window
- Apply second and third barrier coats, lightly sanding between if recoat window is missed
- Apply antifouling paint appropriate to your sailing region and usage pattern
- Apply UV-protective topcoat above the waterline
Pro Tip: Match your antifouling system to your actual use pattern. Hard antifouling is appropriate for vessels that are regularly used and kept in the water full-time. Ablative antifouling is better suited for vessels that spend time on the hard, since it only activates through water contact and won’t over-release when dry-stored. Mismatching these systems is one of the most common and costly owner errors in final finishing.
A strong finishing protocol directly supports your position in the yacht resale preparation process, as surveyors specifically examine barrier coat integrity and antifouling system suitability during pre-purchase inspections.
Luxury case studies and lessons: Superyachts and historic restorations
Understanding restoration best practices at scale clarifies what is truly at stake in any serious project. The numbers involved in elite restorations make the technical standards that much more compelling.
Shamrock V: The benchmark for thoroughness
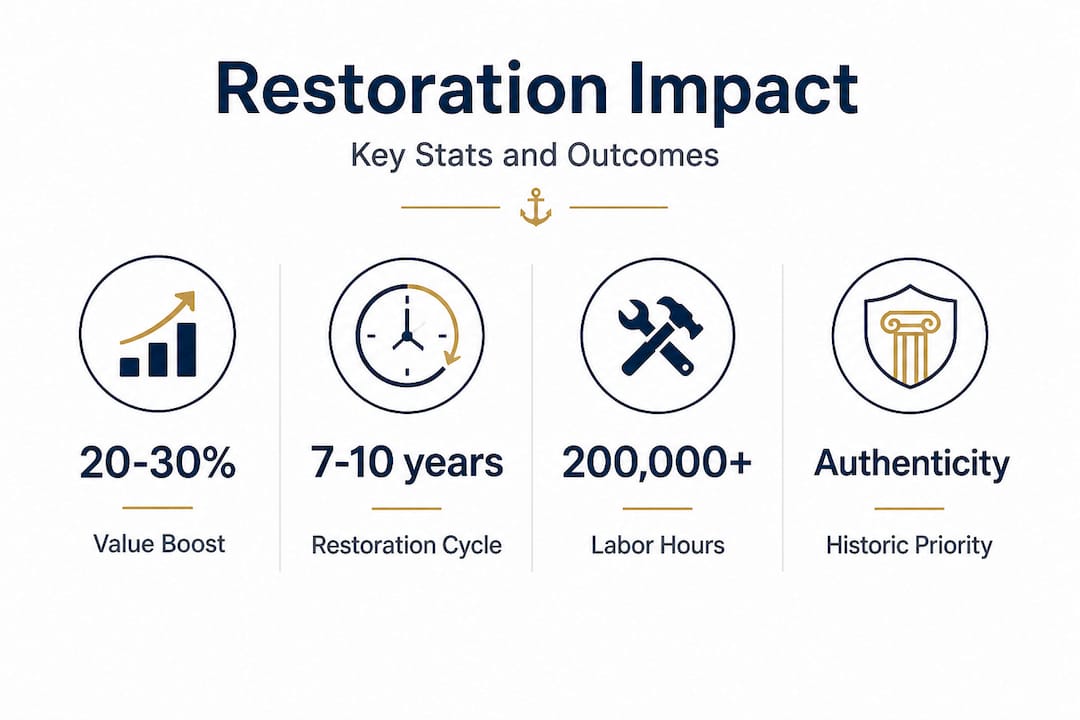
Few restorations in modern yachting history rival the scope of the Shamrock V project. The Shamrock V restoration consumed over 200,000 labor hours, replaced 25% of the frames and 33% of the platework, installed 6,500 new bolts, and reduced overall vessel weight by 3 tonnes through CFD-optimized structural reconfiguration. These are not vanity metrics — every one of those decisions was driven by structural analysis and the requirement to return a racing J-Class yacht to competitive sea-keeping condition.
| Project metric | Shamrock V | Typical superyacht refit |
|---|---|---|
| Labor hours | 200,000+ | Varies by scope |
| Structural replacement | 25% frames, 33% platework | Component-specific |
| Cost range | Historic, bespoke | €10,000 to €100,000+ per meter |
| Primary driver | Authenticity and compliance | Performance and certification |
Historic versus modern restoration priorities
Historic vessels like Shamrock V and Sea Cloud prioritize authenticity, with custom-forged parts and CFD weight optimization, while modern superyachts focus on environmental compliance systems and commercial certification requirements. This divergence matters to you as an owner because it shapes every sourcing decision, from whether to use original-specification fastenings to whether an automated waste treatment system needs integration into the restoration scope.
For large-scale projects, the project management discipline behind a restoration determines whether that €10,000 to €100,000 per meter cost represents value or waste. Without a structured workflow with clear phase gates and quality checkpoints, even the most skilled yard can deliver a technically correct but strategically incoherent result.
Why shortcuts in hull restoration guarantee future headaches
We hold a firm view on this, developed through years of working with owners at every stage from initial purchase through resale: surface polishing is not a restoration strategy. It is a postponement tactic, and it is an expensive one when the bill comes due.
The fundamental problem with cosmetic fixes is that the hull’s structural substrate doesn’t announce its decline. Moisture ingress into a fiberglass laminate progresses silently for seasons before osmotic blistering appears. Galvanic corrosion undermines a metal hull from the inside of the plate outward. Sub-surface rot in a wooden hull can reduce a structural member to near-zero load-bearing capacity while appearing sound to a casual glance. By the time these conditions are visible to a buyer or a surveyor, the remediation cost has multiplied several times over what a properly executed original restoration would have required.
We have watched vessels lose 20 to 30 percent of their anticipated resale value because a previous owner chose a surface-level approach over genuine substrate repair. The luxury upgrade strategies that truly protect and grow vessel value all share one characteristic: they address the structure before they address the aesthetics. Real luxury, in our view, is a hull that performs and surveys well a decade after restoration because the right steps were taken in the right order. That standard is not perfectionism — it is simply what owning a serious yacht requires.
Ready to elevate your yacht? Expert restoration and custom solutions
Knowing the right steps is one thing. Executing them to the standard your vessel deserves requires the kind of expertise, supplier relationships, and project oversight that produces consistent, auditable results.

At Baranof Yachts, we work alongside owners at every stage — from assessing the scope of a restoration to overseeing the finishing sequence and preparing the documentation that supports a strong resale position. Whether you’re evaluating yacht upgrades and restoration for your current vessel or considering bespoke yacht builds that incorporate the latest structural and finishing standards from day one, our team is ready to guide you from concept through completion. Reach out to us to schedule a consultation and take the next step with confidence.
Frequently asked questions
How often should a luxury yacht hull be restored or refinished?
Most luxury yachts benefit from a full hull restoration every 7 to 10 years, though operating environment, usage frequency, and original coating quality all influence that interval.
What makes epoxy superior to polyester for hull repairs below the waterline?
Epoxy is favored for its superior hydrolysis resistance below the waterline, making it far more durable than polyester under sustained seawater exposure and preventing osmotic blistering.
How can I estimate costs for a superyacht hull restoration?
Typical refit costs range from €10,000 to €100,000 or more per meter, depending on vessel size, material type, and the scope of structural versus cosmetic work required.
What is the largest hidden risk during a hull restoration project?
Inadequate substrate preparation is the single greatest hidden risk, as it allows moisture, corrosion, or delamination to develop beneath an otherwise acceptable-looking finish.
Are restoration processes different for historic/classic yachts compared to modern superyachts?
Historic restorations prioritize authenticity through custom-forged parts and period-correct materials, while modern superyacht refits center on environmental compliance systems, commercial certifications, and contemporary performance upgrades.
Recommended
Sold Listings
Design Your Yacht
"*" indicates required fields
Maximus III - PNW
As you step aboard MAXIMUS III, the first impression is her scale.
At 120 feet with an 8-meter beam and 294 GT of interior volume, this 2025 Crescent Custom tri-deck immediately feels open, balanced, and estate-like. A timeless look while still feeling fresh from the shipyard.
Currently Available


Get your yacht value Estimate
"*" indicates required fields